1. Common glassware, equipment and application scope of organic chemistry experiments
The glass instruments, metal appliances, electrical instruments and some other equipment used in organic chemistry experiments are introduced as follows:
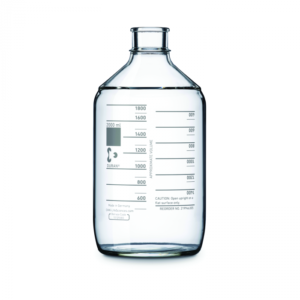
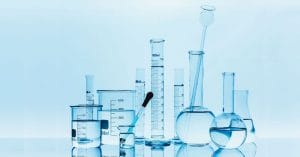
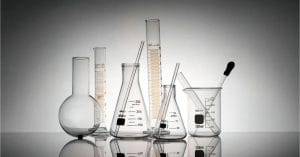
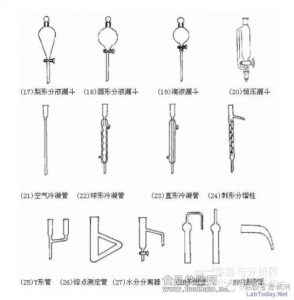
(1)glass glassware
Organic experimental glass glassware (see pic 2.1, pic 2.2), according to the standard of the mouth plug and grinding, and divided into two types of standard grinding equipment and ordinary instruments.
Because the standard grinding instruments can be connected to each other, the use is convenient and strict, and it will gradually replace the common instruments. Use of glass glassware should be handled with care. glassware that is easy to slide (such as round bottom flasks) should not be placed overlapping to avoid breaking.

Except for a few glass instruments, such as test tubes and beakers, it is generally not possible to heat directly with fire. Conical flasks are not pressure resistant and cannot be used for decompression.
Thick-walled glassware (such as suction filter bottles) is not heat-resistant and therefore cannot be heated. Wide-mouth containers (such as beakers) cannot store volatile organic solvents. After the glassware with the piston has been washed, a piece of paper should be placed between the piston and the grinding ring to prevent sticking.
If it is stuck, apply a lubricant or organic solvent around the grinding ring, then blow the hot air with a hair dryer, or boil it with water and then tap the plug with a wooden block to loosen it.
In addition, it is not possible to use a thermometer as a stir bar or to measure temperatures above the scale. The thermometer should be slowly cooled after use. Do not rinse immediately with cold water to avoid bursting.
For organic chemistry experiments, it is best to use a standard ground glass instrument. This type of instrument can be connected to the same number of grinding ports to eliminate the need for plugs and holes, as well as to eliminate contamination of the reactants or products by cork or rubber stoppers.
The size of the standard ground glass instrument is usually indicated by a numerical number, which is the stain of the plug (or rubber stopper). The size of the standard ground glass instrument is usually indicated by a numerical number, which is the millimeter integer of the largest end diameter of the grinding port.
Commonly used are 10, 14, 19, 24, 29, 34, 40, 50 and so on. Sometimes it is also represented by two sets of numbers, and another set of numbers indicates the length of the grind. For example, 14/30 means that the diameter of the grinding point is 14mm at the maximum and the length of the grinding mouth is 30mm.
The same number of grinding and grinding plugs can be tightly connected. Sometimes two glass instruments, if they cannot be directly connected due to different grinding numbers, can be connected by means of different numbered grinding joints (or size heads) [see pic 2.2(9)].

Note when using a standard glass glassware:
(1) The grinding mouth must be clean. If there is solid debris, the grinding mouth will not be tightly connected and cause air leakage. If there are hard objects, it will damage the grinding.
(2) Wash and disassemble after use. Otherwise, if it is placed for a long time, the joint of the grinding mouth will often stick and it is difficult to disassemble.
(3) There is no need to apply lubricant to the general purpose grinding to avoid contamination of the reactants or products. If there is a strong base in the reaction, a lubricant should be applied to prevent the joint of the grinding joint from sticking due to alkali corrosion and cannot be disassembled. When vacuum distillation, the grinding mouth should be coated with vacuum grease to avoid air leakage.
(4) When installing the standard grinding glass instrument, it should be ensured that it is correct, tidy, and stable so that the joint of the grinding joint is not subject to the stress of skewing, otherwise the instrument will be easily broken, especially when heating, the instrument is heated and the stress is greater.
WUBOLAB is a very professional laboratory glassware manufacturer.
2 metal appliances
Metals commonly used in organic experiments are iron frame, iron clip, iron ring, tripod, water bath, tweezers, scissors, triangular file, round file, plug press, puncher, steam generator, gas lamp, stainless steel scraper , lifting platform, etc.
3 Electrical instruments and small electromechanical equipment
(1) hair dryer
The hair dryer used in the laboratory should be able to blow cold air and hot air for drying glass equipment. It should be placed in a dry place to prevent moisture and corrosion. Regular lubrication
(2) electric heating jacket (or electric heating cap)
It is a heater in which glass fiber is wrapped with electric heating wire and woven into a hat shape (see pic 2.3). When heating and distilling organic matter, it is not easy to cause fire because it is not open flame, and its thermal efficiency is also high.
The heating temperature is controlled by a pressure regulating transformer, and the maximum temperature can reach about 400 °C, which is a simple and safe heating device in organic test.
The volume of the electric heating sleeve is generally matched with the volume of the flask. From 50mL, various specifications are available. The electric heating sleeve is mainly used as a heat source for reflow heating.
When it is used for distillation or vacuum distillation, as the distillation progresses, the contents of the bottle are gradually reduced.
At this time, heating with the electric heating sleeve causes the bottle wall to overheat and causes the distillate to be scorched. If the electric heating jacket of the larger one is used, the height of the lifting platform of the electric heating sleeve is continuously reduced during the distillation process, and the scorching phenomenon is reduced.
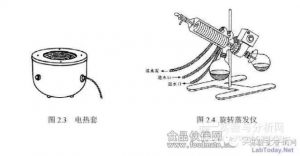
(3) Rotary evaporator
The rotary evaporator is composed of a condenser and a receiver that is driven by a motor to rotate the evaporator (round bottom flask) (see Figure 2.4). It can be operated under normal pressure or reduced pressure. It can be fed at one time or in batches.
Evaporate the liquid. Due to the constant rotation of the evaporator, zeolite can be avoided without bumping. When the evaporator rotates, the evaporation surface of the feed liquid is greatly increased, and the evaporation speed is accelerated. Therefore, it is an ideal device for concentrating solutions and recovering solvents.
(4) Voltage regulating transformer
The voltage regulating transformer is a device for adjusting the power supply voltage, and is commonly used to adjust the temperature of the heating electric furnace.
(5) Electric mixer
The electric agitator (or small motor with a pressure regulating transformer) is used for agitation in organic experiments. Generally applicable to solutions such as oil and water or solid-liquid reactions. Not suitable for overly viscous gelatinous solutions. If it is overloaded, it is very hot and burns. It must be connected to the ground wire during use. It should be kept clean and dry, moisture-proof and corrosion-proof. Bearings should always be refueled to maintain lubrication.
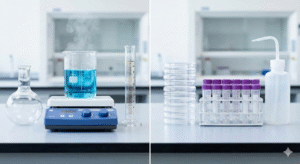
(6) Magnetic stirrer
It consists of a soft iron (called a magnetic bar) sealed with glass or plastic and a rotatable magnet. Put the magnetic rod into the reactant container to be stirred, place the container on the agitator tray with the rotating magnetic field, turn on the power, change the magnetic field due to the rotation of the internal magnet, and rotate the magnetic rod inside the container. , to achieve the purpose of mixing. A general magnetic stirrer (such as a Type 79-1 magnetic stirrer) has a knob that controls the speed of the magnet and a temperature-controlled heating device.
(7) Oven
The oven is used to dry glass instruments or to dry articles that are non-corrosive and do not decompose when heated. Volatile flammable materials or glass instruments that have just been rinsed with alcohol or acetone should not be placed in an oven to avoid an explosion.
Oven use instructions: After connecting the power supply, you can turn on the heating switch, then turn the temperature control knob clockwise from the “0” position.
To a certain extent (depending on the oven model), the oven will start to heat up and the red indicator light will illuminate. If there is a blower, turn on the blower switch to make the blower work.
When the thermometer rises to the working temperature (observed from the thermometer reading on the top of the oven), the thermostat knob is slowly rotated counterclockwise, and the indicator light just turns off. At the alternate position of the indicator light, it is the constant temperature fixed point.
Generally, the glass equipment should be drained first, and then placed in an oven without water drops. The temperature is raised and the temperature is controlled at about 100-120 °C. The ovens in the laboratory are common instruments. When placing the glass instruments in the oven, they should be placed from top to bottom in order to prevent the residual water droplets from flowing down to cause the underlying glassware to burst.
When removing the dried instrument, apply a dry cloth to protect the scald. Do not touch the water after removal to prevent it from bursting. After taking out the hot glassware, if it is allowed to cool itself, the wall will often be condensed. The air blower can be blown into the cold air to help it cool down, so as to reduce the condensation of water on the wall.
4 other equipment
(1) platform scale
In organic synthesis laboratories, the instruments commonly used to weigh the mass of objects are platform scales. The maximum weighing of the scale is 1000g, or 500g, which can be weighed to 1g. If using a pharmaceutical scale (also known as a small scale), the maximum weighing is l00g, which can be weighed to 0.1g.
(2) Torque balance
- In the case of semi-micro preparation, a torque balance can be used because the sensitivity of the conventional scale is insufficient. The torque balance can be accurate to 0.0lg. Adjust the foot screws to balance the left and right before use. When weighing lg or less, it can be adjusted by rotating the mass knob.
(3) cylinder
Note when using cylinders:
The cylinder should be placed in a cool, dry place away from heat sources to avoid direct sunlight. Hydrogen cylinders should be placed in a gas cylinder room separate from the laboratory. Steel cylinders should be placed as little as possible in the laboratory.
When carrying the cylinder, screw the cap, put on the rubber band, and gently handle it to prevent it from falling or vibrating.
When using the cylinder, if it is placed upright, it should be bracketed or tied with wire to avoid falling; if it is placed horizontally, it should be stabilized to prevent rolling, and oil and other organic substances should be prevented from contaminating the cylinder.
cylinders should be used with decompression tables. Generally, the flammable gas (hydrogen, acetylene, etc.) cylinder valve threads are reversed, and the non-combustible or combustion-supporting gas (nitrogen, oxygen, etc.) cylinder valve threads are positive. Various decompression tables must not be mixed. Open the valve Should stand on the other side of the decompression table to prevent the decompression table from coming out and being injured.
The gas in the cylinder is not available, and should be kept above 0.5% gauge pressure to prevent danger when refilling.
When using flammable gas, there must be a device to prevent tempering (some decompression tables have such a device). A fine copper wire mesh is placed in the conduit, and a liquid seal is added to the pipeline to protect it.
cylinders should be pressure tested regularly (the general cylinders are inspected once every three years). If it is not tested or the corrosion is serious, it shall not be used, and the leaking cylinder shall not be used.
(4) Decompression table
The decompression table consists of a total pressure gauge indicating the cylinder pressure, a pressure reducing valve for controlling the pressure, and a partial pressure gauge after the pressure reduction. When using, please pay attention to the connection between the decompression table and the cylinder (do not screw!), then turn the pressure regulating valve of the decompression table to the loosest position (ie, closed).
Then open the cylinder total gas valve, the total pressure gauge shows the total gas pressure inside the bottle. Check the joints (with soapy water) without leaking, then slowly tighten the pressure regulating valve to make the gas slowly pass to the system. When using, first close the cylinder total valve and empty the gas of the system.
When the total pressure gauge and the partial pressure gauge all point to 0, loosen the pressure regulating valve. If the connection between the cylinder and the decompression table is leaking, a gasket should be added to seal it. It must not be blocked with hemp and other materials. In particular, oxygen cylinders and decompression tables must not be oiled. This should be especially noted.
Second, the common equipment for organic experiments
- In order to facilitate the review and comparison of the basic operations common in organic chemistry experiments, the instrumentation of reflux, distillation, gas absorption and agitation is discussed here.
1 reflux device
Many organic chemical reactions need to be carried out near the boiling point of the solvent or liquid reactant of the reaction system, in which case a reflux unit is used (see Figure 2.6). Figure 2.6(1) is a general heating reflow device; Figure 2.6(2) is a moisture-proof heating reflow device; Figure 2.6(3) is a reflow device with a gas generated in the absorption reaction, suitable for water-soluble gas during reflow (eg: Experiments produced by HCl, HBr, SO2, etc.; Figure 2.6(4) is a device capable of simultaneously dropping liquid at the time of reflux. Before reflux heating, the zeolite should be placed first.
According to the boiling temperature of the liquid in the bottle, it can be directly heated by water bath, oil bath or asbestos net. Under the conditions, the asbestos net is generally not used to directly heat with open flame. The rate of reflux should be controlled so that liquid vapor infiltration does not exceed two spheres.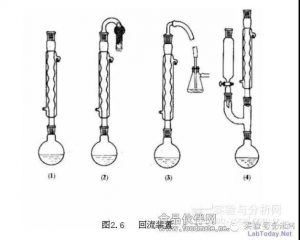
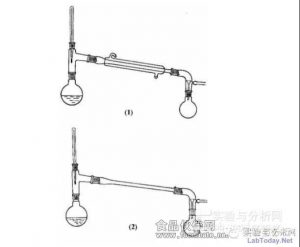
2 distillation unit
Distillation is a common method for separating two or more liquids having a large difference in boiling point and removing an organic solvent. Several common distillation units (see Figure 2.7) can be used for different requirements. Figure 2.7(1) is the most commonly used distillation unit. Since the outlet of this unit is open to the atmosphere, it may escape the vapor of the distillate. If the low-boiling liquid which is volatile is distilled, the branch of the liquid-pipe should be connected to the rubber tube. , to the sink or outside. The branch pipe is connected to a drying pipe and can be used as a moisture-proof distillation.
Figure 2.7 (2) is a distillation apparatus using an air condensing tube, which is commonly used to distill liquids having a boiling point above 140 °C. If a straight water condenser is used, the condenser tube will burst due to the high temperature of the liquid vapor. Figure 2.7 (3) is a device for evaporating a larger amount of solvent. Since the liquid can be continuously added from the dropping funnel, the speed of dropping and steaming can be adjusted, and a larger distillation bottle can be avoided.

3. Gas absorption device
A gas absorption device (see Figure 2.8) is used to absorb irritating and water-soluble gases such as HCl, SO2, etc. generated during the reaction. Among them, Figures 1.8(1) and 18.(2) can be used as absorption devices for small amounts of gas. The glass funnel in 2.8(1) should be slightly inclined so that the funnel is half in the water and half on the water.
This will prevent gas from escaping and prevent water
It is sucked back into the reaction flask. If a large amount of gas is generated during the reaction or the gas escapes quickly, the device of Figure 2.8(3) can be used. Water flows from the upper end (water that can be discharged from the condenser) into the filter bottle and overflows on a constant plane. . The thick glass tube just protrudes into the water and is sealed by water to prevent gas from escaping into the atmosphere. The thick glass tube in the figure can also be replaced by a Y-shaped tube.
4 the stirring device
When the reaction is carried out in a homogeneous solution, it is generally possible to avoid agitation because the solution has a certain degree of convection during heating, thereby keeping the liquid portions uniformly heated.
If it is a heterogeneous reaction, or one of the reactants is gradually added dropwise, in order to mix it as quickly and uniformly as possible, to avoid the occurrence of other side reactions or decomposition of organic matter due to local overheating; sometimes the reaction product is solid.
If the stirring is not carried out, the reaction will proceed smoothly; in these cases, stirring is required. The use of a stirring device in many synthetic experiments not only allows better control of the reaction temperature, but also shortens the reaction time and increases the yield.
The commonly used mixing device is shown in Figure 2.9. Figure 2.9(1) is an experimental device capable of simultaneously stirring, refluxing and adding liquid from a dropping funnel; the device of Figure 2.9(2) can simultaneously measure the temperature of the reaction; Figure 2.9(3) is a stirring device with a drying tube Figure 2.9(4) is magnetic stirring.

5 instrument device method
The glass instrument devices commonly used in organic chemistry experiments generally use iron clips to fix the instruments to the iron frame in turn. The double clamp of the iron clip should be attached with soft materials such as rubber and flannel, or wrapped with asbestos rope and cloth strip. If the iron clamp is directly clamped to the glass instrument, it is easy to pinch the instrument.
When clamping the glassware with the iron clip, first clamp the double clamp with the left hand finger, and then tighten the iron clamp screw. When the clamp finger feels the screw touches the double clamp, it can stop the rotation, so that the object is not loose. .
Taking the reflow device [Fig. 1.6(2)] as an example, the instrument is first clamped to the bottle neck of the round bottom flask with iron clamp according to the height of the heat source (generally based on the height of the tripod), and is fixed vertically on the iron frame. The iron frame should face the outside of the test bench and should not be skewed. If the iron frame is skewed, the center of gravity is inconsistent and the device is unstable.
Then, the lower end of the spherical condensation tube is fixed to the top of the flask with the iron clip vertically, and then the iron clip is loosened, the condensation tube is put down, the grinding port is tightly screwed, and then the iron clip is slightly tightened to fix the condensation tube. So that the iron clip is located somewhere in the middle of the condenser tube. Connect the condensate with a suitable rubber hose with the inlet below and the outlet above. Finally, press 1.6(2) to dry the tube at the top of the condenser.
General rules for installing instruments:
(1) first down and then up, from left to right;
(2) Correct, tidy, stable, and correct; its axis should be parallel to the edge of the test bench.